From SharePoint Online you can trigger a flow by using a link or a button. Sometimes you want to include data with that trigger action. In this article I will show you how to retrieve the email address of the person who clicked the button in a Power Automate flow.
Update 20-07-2024: a second version of this solution has been created which includes a success page, read about it in the Success page for HTTP request blog.
Inspiration
This question from anthonys123:
My thought was to create a flow in PowerAutomate so when a button is pressed it sends a pre-scripted email from the person pressing the button. The directive is to confirm that someone has reviewed the page.
Power Platform Community thread: I need to add a button to a SharePoint page to send an email.

Queries
The first challenge was how to include the data. I figured the best approach would be the When a HTTP request is received trigger action. This action allows a custom body JSON schema.
However, in this instance we would not be able to include the body unless we would use some code with a POST request, which I did not want.
Luckily, I found the Queries section of the GET request. You could add parameters at the end of your URL (&customparameter=value).

It is possible to retrieve that parameter value within the flow via an expression like:
@me special string value
The second part of the challenge was to retrieve the actual data to include into the GET request. In this example I had a look at the formatting syntax reference article. There is an interesting section in there with special string values.
I have used the @me string value before in the course registration with list formatting blog. This string value will evaluate to the email address of the current logged in user.
Another interesting one is the @currentWeb string value. This string value will evaluate to the absolute URL for the site.
Formatting
The third part was to create a button with List formatting. Be sure to check out PnP GitHub io which has a lot of great List Formatting examples!
For the column formatting configuration I decided to use button and a type of elements. With this it is possible to point to your cloud flow link via a href attribute.
With view formatting it possible to hide column headers and to hide the ability to select a row.
Great, these are all the components which we need. Let’s start building the solution!
Flow setup
The first big part is setting up your cloud flow in Power Automate.
This example uses a Request connector action which is part of a premium feature, make sure you have a license which covers this.
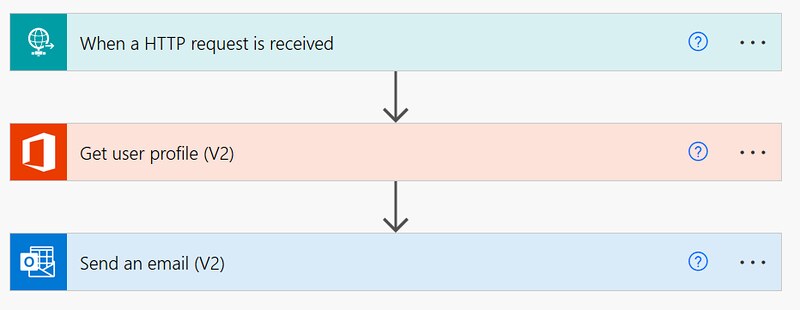
1. Add a When a HTTP request is received trigger action.

a. Select the GET method under advanced options
b. Copy the HTTP GET URL value, you will need it for the column formatting part.
2. Add a Get User profile (v2) action.
To retrieve the email for user who clicked the button.
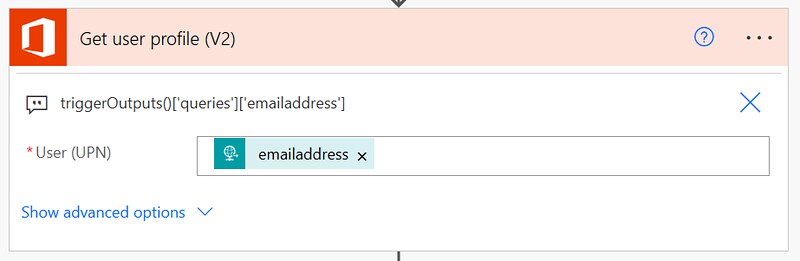
a. Add the expression from the code snippet below via the Expression editor to the User (UPN) field.
3. Add a Send an email (V2) action.

a. Use the Mail dynamic content field in the To field
b. Provide a Subject value
c. Provide a Body value. In this instance I also used the displayName of the user and the site address which is hosting this news post. I used the value from the code snippet below.
That is it for the cloud flow setup of this example.
List setup
The second big part is setting up your SharePoint Online List which will host your button.
1. Create a blank list in SharePoint Online.

a. Provide a Title value, I used Email me Button
2. Add one list item to the new List
a. Provide a Title value, does not really matter what this is
3. Apply column formatting to Title column

a. Click on the Title Column > Column Settings > Format this Column
b. Copy/paste the Json from the code snippet below into the Format columns editor
c. Modify the href attribute value and replace “https://WhenarequestisreceivedGETurl” with your value from the Flow setup step 1b.
d. Click Save
4. Create a new view and format it
a. Click Create new view in the view menu
b. Provide a view name, I used Single Button view
c. Select Show as List
d. Click Create
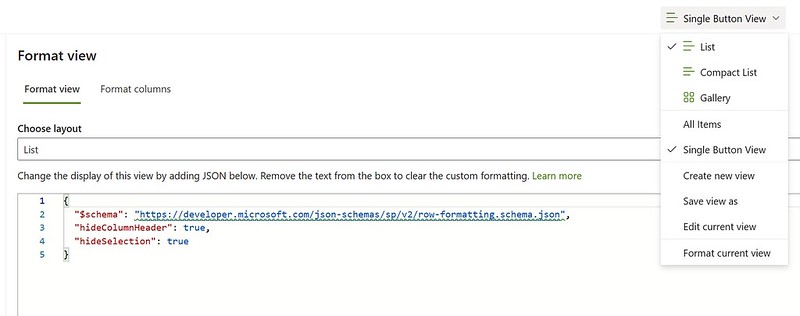
e. Select the View and click Format current view in the view menu
f. Copy/paste the Json from the code snippet below into the Format view editor
g. Click Save
That is it for the list setup of this example.
Page setup
The last part is setting up your SharePoint Online page which will display the button.
1. Create a new page or news post

2. Add a list web part
a. Edit the page/news post
b. Add the List web part
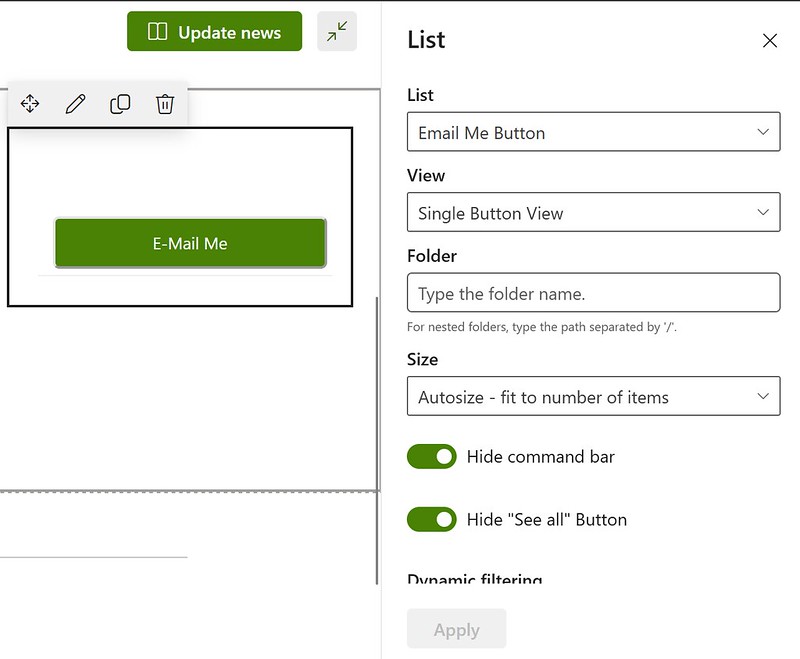
c. Click Edit web part (pencil icon)
d. Select the list, Email Me Button
e. Select a View, Single Button View
f. Enable the Hide command bar toggle
g. Enable the Hide “See all” Button toggle
h. Click Apply
i. Remove the Title of the Web Part if needed
j. Publish the page/news post
That is it for the whole setup of this example.
Happy testing!


Hello
thank you for this post. I have some questions :
In the “When a Http request is received” step, do you have to add some extra parameters to get the email address ?
Where do you insert this text “triggerOutputs()[‘queries’][’emailaddress’]” ?
Thanks
Pierre-Yves
OK I’ve understood ! There is no need to add extra parameter in the “When a Http request is received” step, It is in the formatting of the button that I need to add these parameters. I had just to follow all your example. I was confused because whne you decrible the flow, you already indicate to insert triggerOutputs()[‘queries’][’emailaddress’]” . So I was thinking some parametr had to be inserted in the first trigger of the flow. In fact it is only at the end of the post when you describe the button that I understood the parameter is inserted in the button !
Thanks for your job
Great post – thanks for that.
I was able to successfully start a flow and generate an answer via a response.
Now I have the problem that the flow sometimes runs for a long time and it comes to a timeout response. Is there a way to increase the timeout?
Hi Frank,
As far as I am aware that trigger action does not have any Timeout settings. You could however have a look at the concurrency control settings instead?
https://forwardforever.com/flow-and-concurrency-control-2/
Hey, this is exactly what I’m looking for! I’ve followed all the steps, but the button isn’t showing on the page, it just shows the list with no items in it. Help!
Scrap my previous comment, I hadn’t added a list item, missed that part!
Although, now when I click on the button I get this error…
{“error”:{“code”:”AuthorizationFailed”,”message”:”The authentication credentials are not valid.”}}
Any ideas? Thanks.
Hi Robbie,
Since I have written this blog a new version of the When an HTTP request is received trigger action was released, it now includes a parameter which allows you to select who can trigger the flow:
https://learn.microsoft.com/en-us/power-automate/oauth-authentication?tabs=classic-designer#choose-an-authentication-parameter
Which option did you use in that dropdown? In my setup that option wasn’t available, so that would resemble the Anyone option.
Hi Dennis,
Thanks so much for the post! Very helpful
I have a question related to the button- When I click on the button it opens a new tab with the url – https://prod…
Is it possible to trigger the flow (click the button) without opening a new tab with the trigger URL?
Or if we can open a new tab with a different URL (eg. success page)
Thanks!
Hi Ankit,
It is possible to return a response. You can use the Response action and for example use Content-Type: text/html to return a text html success page back.
Hi Ankit,
I have now created a second blog post where I demonstrated this Response action/success page approach:
https://www.expiscornovus.com/2024/07/20/success-page-for-http-request/
Hi there,
I love this option to call a flow using a customized button within a Microsoft Lists, it opens up to so many different ways to innovate for users.
I’m wondering, is there a way to know what are all the parameters available to send from a MS List? Like for example, would it be possible to query the current ID of the item that the button was clicked, or the list’s name. If there is more, where can I find all the different parameters that can be sent using the ‘@’?
Hi again,
I managed to find a way to send in the ID in parameter.
By looking at some documentation in the column formatting section of SharePoint’s development website
[https://learn.microsoft.com/en-us/sharepoint/dev/declarative-customization/column-formatting],
I found out it was possible to send in the ID of the item by using “[$ID]”
Unsuccessful with the idea of sending in the List Name as a variable like above, I will simply pass the parameter statically.
If anyone has a clue on how to send the List Name as a variable, please let me know.
Thank you