A lot of great Power Virtual Agents announcements at Ignite. Notify team users with proactive messages is now in public preview. In this article I am using proactive messages to retrieve details from a primary contact of a Dynamics 365 Customer Service case (incident).

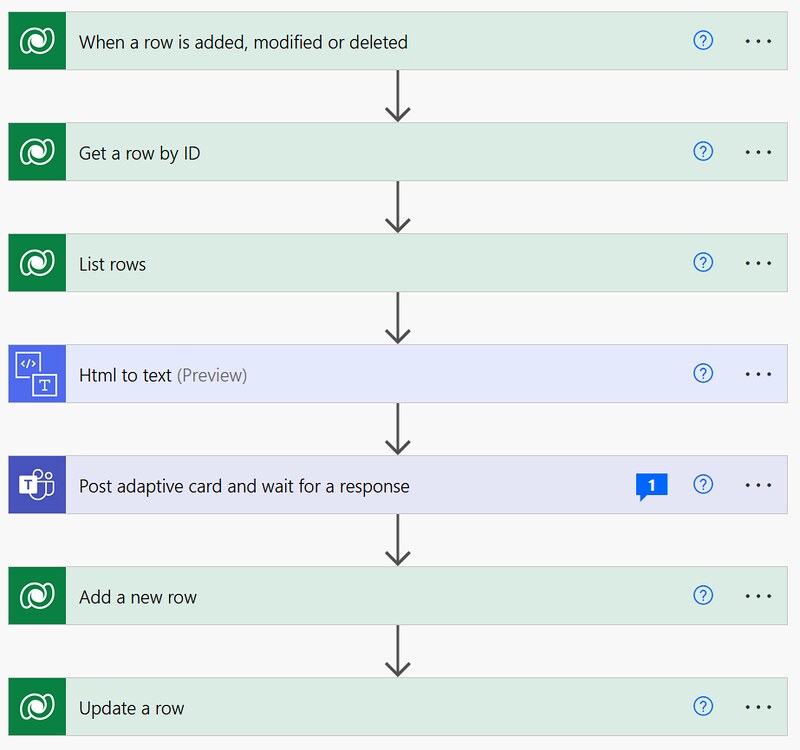 1. When a row is added, modified or deleted trigger action. Select the Cases table and make sure you only trigger it when the statuscode is set to Waiting for Details (3).
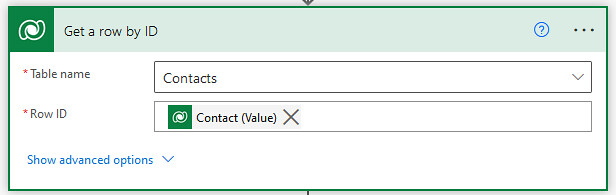
 2. Add a Get a row by ID action. Select the Contacts table. Use the Contact (value) for the Row ID.
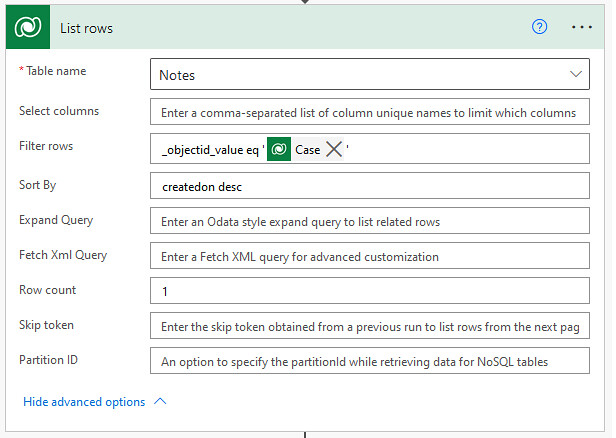
 3. Add List rows actions. Select the Notes table. Filter on the related case and only retrieve the last one.
 4. Add a Html to text action. Use the expression from the code snippet below.
 5. Add a Post adaptive card and wait for a response action. Select Post as Power Virtual Agents (Preview) and Post in Chat with bot. Use the code snippet below for the Message.
 6. In the Post adaptive card and wait for a response action make sure you use the Email property from the Get row by id action. Select the Power Virtual Agent you want to use for sending the notifications. In this example that is the Case Assistent bot.
 7. Add a Add a new row action. Use the field you want from the body/data from the Post adaptive card and wait for a response action response.
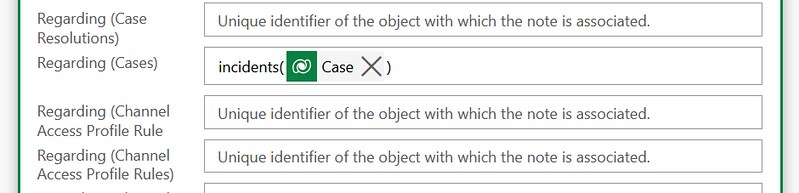
 8. In the Add a new row action relate the new row to the existing case.
 9. Add a Update a row action. Update the existing case to the Statuscode In Progress.

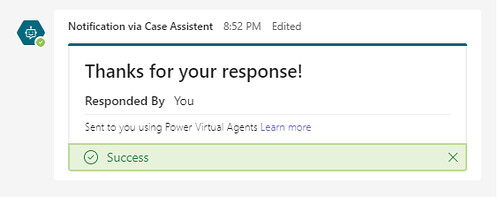
 3. This will be the card after you responded
 4. Navigate to the case. It should have a new note and the status should be In Progress.
 Happy testing!
Waiting for Details
In this example I am using the case (incident) table from Dynamics 365 Customer Service as an example. When a status of a case is set to Waiting for Details the owner requires more details from the primary contact. The idea is to retrieve the last note (annotation) and use this to notify the primary contact about this via a proactive message with an adaptive card from the Power Virtual Agent. The response will be stored in a new note and the status of the case will be updated to In Progress.
Prerequisites for this example
Before you start it is good to know that these bits were created for this example. 1. Create Power Virtual Agents bot, which is used in the configuration of the Adaptive card action. 2. Add a chatbot to Microsoft Teams, the bot is installed in Teams so we can chat with it.Flow setup
1. When a row is added, modified or deleted trigger action. Select the Cases table and make sure you only trigger it when the statuscode is set to Waiting for Details (3).
2. Add a Get a row by ID action. Select the Contacts table. Use the Contact (value) for the Row ID.
3. Add List rows actions. Select the Notes table. Filter on the related case and only retrieve the last one.
4. Add a Html to text action. Use the expression from the code snippet below.
5. Add a Post adaptive card and wait for a response action. Select Post as Power Virtual Agents (Preview) and Post in Chat with bot. Use the code snippet below for the Message.
6. In the Post adaptive card and wait for a response action make sure you use the Email property from the Get row by id action. Select the Power Virtual Agent you want to use for sending the notifications. In this example that is the Case Assistent bot.
7. Add a Add a new row action. Use the field you want from the body/data from the Post adaptive card and wait for a response action response.
8. In the Add a new row action relate the new row to the existing case.
9. Add a Update a row action. Update the existing case to the Statuscode In Progress.
Testing the result
1. Set the status of the case to Waiting for Details. 2. Respond to the adaptive card
3. This will be the card after you responded
4. Navigate to the case. It should have a new note and the status should be In Progress.
Happy testing!