Within SharePoint Online it is possible to share a site with guest users. In this article I will show you how to e-mail a guest users overview for a site via a Power Automate flow.
Inspiration
This question from Kamz:
I’ve been trying to figure out a way to build a flow that gets a guest user’s expiration date, however I cannot figure out where that date is stored. I’ve checked Azure, Security, Compliance, you name it.
Anyone know where I can find where expiration is stored? I’d like to then do a scheduled flow of expiring users and email a list to stakeholders.
Power Users Community thread: Guest Expiration Date for Users.

Guest Expiration Management
Before you start I would like to point out that SharePoint Online has some nice Guest expiration features.
Whenever access for a guest is about to expire you would see a banner in the top of the site.

When you click on the banner you will see who has guest access and when it is about to expire.

But sometimes these kind of controls are not enough. Today we are going to explore how we can extract this data and include it in a weekly email to the owners.
IsShareByEmailGuestUser
The first challenge was how to retrieve the data. I figured the best place to start looking was the UserCollection resource.
After a couple of test runs I saw there is a Boolean property on the User called IsShareByEmailGuestUser. It is possible to use this property in $filter with the Siteusers collection.
List Owners
The second requirement is to sent this e-mail to stakeholders. In my case these are the owners of the Microsoft 365 group connected Team Site.
To retrieve the owners we can use a List group owners of the Graph API. The e-mail addresses of these owners can be joined together into the To field of the Send an Email (v2) action.
Flow setup

1. Add a Recurrent trigger action.

a. Select an Interval, in this setup 1
b. Select the Frequency, in this setup Week
c. Select the Days, in this setup Monday
d. Select the Hours, in this setup 08
2. Add a Send an HTTP request to SharePoint action.
This action is to retrieve the connected group of the SharePoint Team site. I have blogged about this in Get Group ID by SharePoint Site Url.
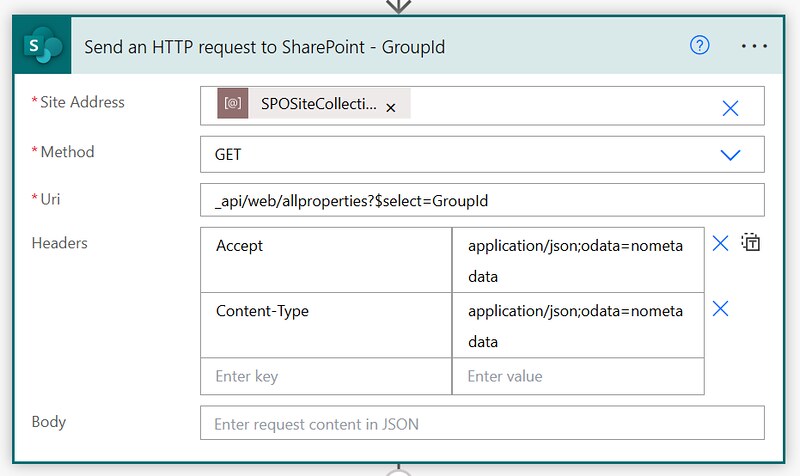
a. Select your preferred site in the Site Address
b. Use the GET method
c. Use the URI from the code snippet below
d. Use the Headers from the code snippet below
3. Add a Send an HTTP request action.

a. Use the URI from the code snippet below
b. Use the GET method
c. Adjust the Content-Type field value to the one from the code snippet below
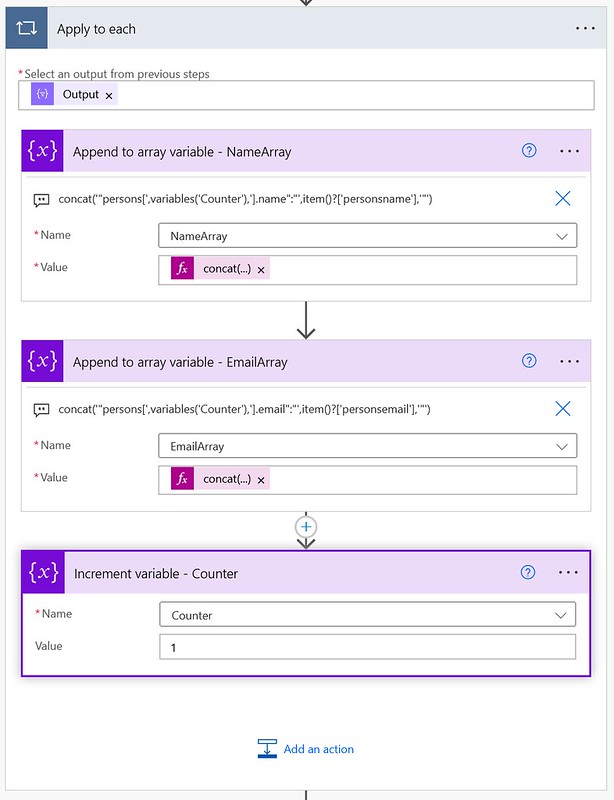
4. Add a Select action.
a. Use the body/value from the Send an HTTP request action of step 3 in the From field (via the Expression tab)
b. Switch the Map field to text mode
c. Add the code snippet below in the Map field
5. Add a second Send an HTTP request to SharePoint action.

a. Select your preferred site in the Site Address
b. Use the GET method
c. Use the URI from the code snippet below
d. Use the Headers from the code snippet below
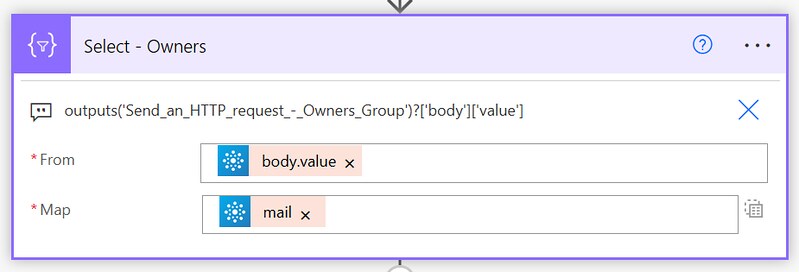
6. Add a second Select action.

a. Use the body/value from the Send an HTTP request to SharePoint action of step 5 in the From field
b. Switch the Map field to text mode
c. Use the code snippet below and copy/paste it directly into the Map field
7. Add a Create HTML table action.

a. Use the output of the Select from step 6 in the From field.
8. Add a Compose action.

a. I used some CSS from Ryan Maclean again, check out his blog, Power Automate HTML table styling.
b. Use the output of the Create HTML Table action from step 7 at the end of the Compose Inputs field.
9. Add a Send an email (v2) action.

a. Use the code snippet below in the To field
b. Provide a Subject value, I used: Guest users access and expiration – Weekly summary
c. Switch the Body to HTML view. Use the output of the Compose action of step 8.
That is it for the whole setup of this example.
Happy testing!