Via a Power Automate flow it is possible to automatically respond to a calendar invite. The flow in this article shows how you can also delete the calendar invite e-mail after you have RSVP’d.
Inspiration
This question from aishak12:
I want to accept a meeting invitation and then delete the invitation to from “Inbox” to “Deleted”. Right now the accept meeting invitation is working however it is not deleting the invite.
Power Users Community thread: Power Automate Accept meeting then delete from Inbox.
Calendar invite e-mail not deleted
The Respond to an event invite (v2) action is very easy to use to auto-accept calendar invites. Unfortunately, the original calendar invite e-mail does not get deleted, after the invite has been accepted.
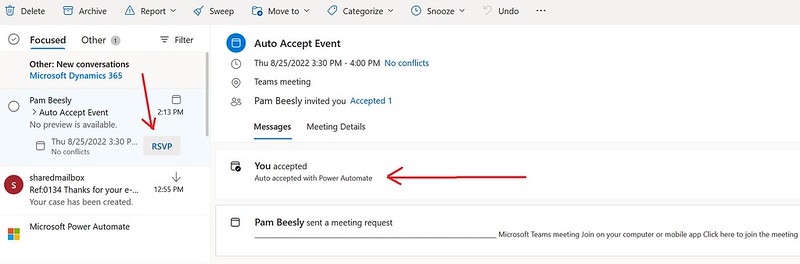
In the interface the calendar invite e-mail does get deleted. This is to avoid confusion that you have not responded yet. With Power Automate you would want that same behaviour.
$Filter eventMessage on subject
The challenge with this scenario is that the When an new event is created trigger action does not contain a link to the related event message. Luckily, the Graph API has the eventMessage resource type.
With the Get eventMessage method it is possible to retrieve events. You can combine that with a $filter query parameter which uses the subject value to find the correct eventMessage via the Graph API.
Flow setup

1. Add a When a new event is created (V3) action.
In this setup I am using a trigger condition to make sure that only invites with a certain subject are auto-accepted.
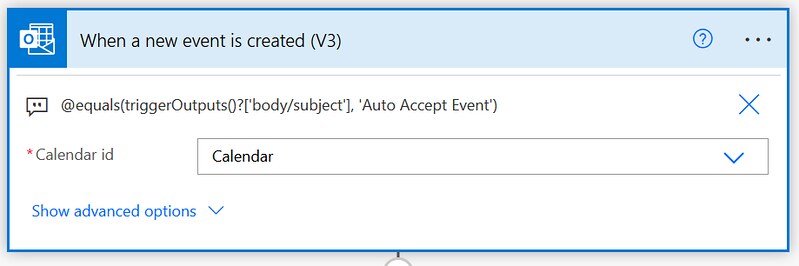
a. Select your Calendar
b. In the Settings add the trigger condition from the code snippet below
2. Add a Respond to an event invite (V2) action.
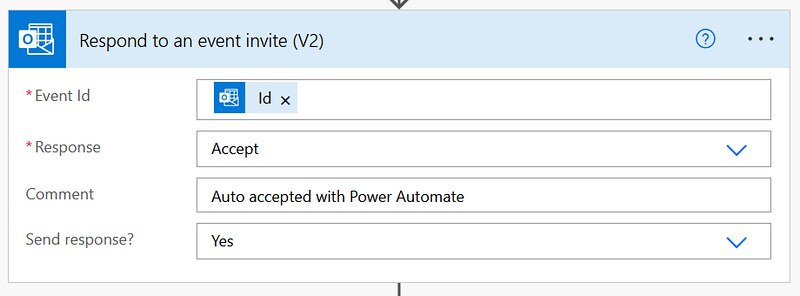
a. In the Event Id use the Id of the trigger action
b. Select Accept as the Response
c. Provide a value for the Comment.
d. Select Yes as the Send response?
3. Add a Send an HTTP request action.

a. Use the URI from the code snippet below
b. Use the GET Method
4. Add a Delete email (V2) action.
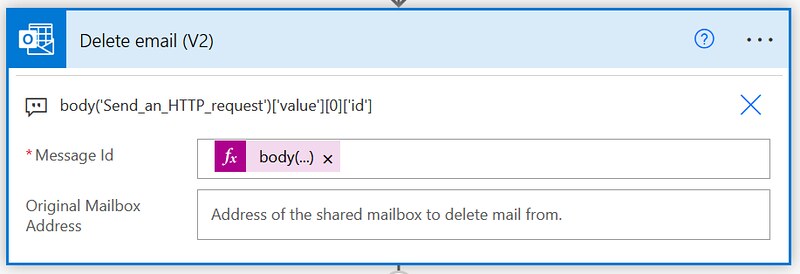
a. Use the expression from the code snippet below for the Message Id
That is it for the setup of this example.
Happy testing!


I had trouble getting the trigger condition to work, and ended up having to ask a question on the Power Automate community forum. Luckily, someone knew that you need to have turned on the ‘Split on’ setting and select the only available option for the Array, which was @triggerOutput()?[‘body/value’]
Thanks for letting me know. Btw, this is a blogpost from 2022 with the old designer. Unfortunately, Microsoft has changed the default value of the Split On setting in the new designer, it is disabled by default.
That is why the trigger action is returning an array of instead of just the subject property. And the trigger condition won’t work with that Split On disabled.
Like Manish said on the forums. For this to work you need to enable the Split On setting (like in the old designer).
https://powerusers.microsoft.com/t5/Building-Flows/Problem-with-Trigger-Condition-for-When-a-new-event-is-created/m-p/2598722/highlight/true#M291046
Hello – I would like to set up my gmail account so that it automatically deletes any calendar invite emails once I have RSVP’d to the event. But I am not looking to automate any event RSVPs (as is documented in this post). Can you help me? Thank you!